Showing posts with label Microsoft Teams. Show all posts

How to enable Outlook Teams Addin

Method 1:

1.      In Outlook Desktop, click File > Manage COM Add-ins.

2.     Expand the Options for the Microsoft Teams Meeting Add-in for Microsoft Office and select Do not monitor this add-in for the next 30 days.  If that option is not available, then select Always enable this add-in. Then select Apply and Close.

3.      If the steps above did not solve the issue, re-enable the add-in from the Disabled Items dialog. To re-enable the Teams Meeting add-in:

1.      In Outlook, select File Options Add-ins Manage,

2.      Select “Disabled items” and then Go.

3.      If you see Teams listed under Disabled Items, select it and then select Enable.

4.      Restart Outlook and confirm if the add-in is working.


Method 2: 

Reregister the Teams Add-in DLL File

The “Microsoft.Teams.AddinLoader.dll” file helps the Teams Meeting add-in work smoothly in Outlook. Re-registering this Dynamic Link Library (DLL) file can restore the Teams Meeting add-in to your Outlook application.

It’s a lengthy but straightforward process. Close Microsoft Teams and Outlook and follow the steps below to re-register the “Microsoft.Teams.AddinLoader.dll” file.

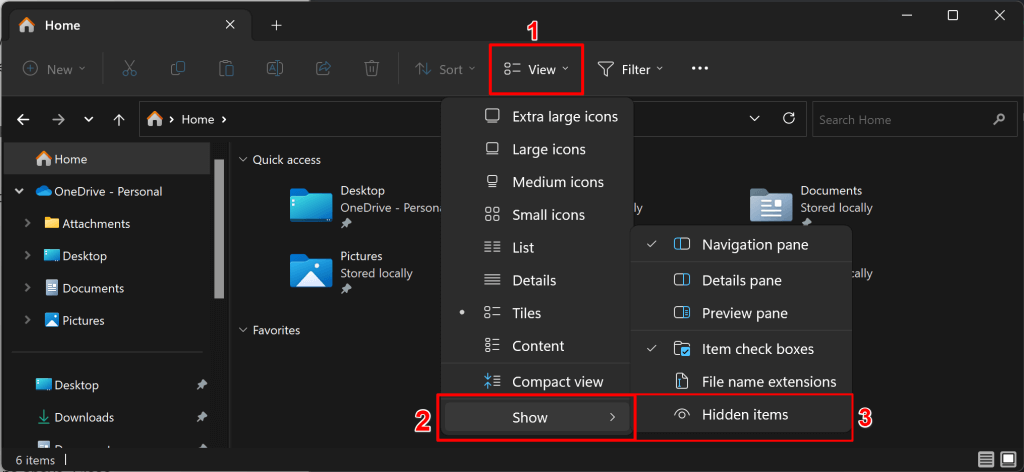
  1. First, you need the path/location of the Microsoft.Teams.AddinLoader.dll file on your PC. Open the File Explorer (Windows key + E), select View on the top menu, choose Show, and select Hidden items.

  1. Open C:\Users\Username\AppData\Local\Microsoft\TeamsMeetingAddin\1.0.23241.2\x64
  2. Open the x86 folder if you have a 32-bit PC or the x64 folder if your PC is 64-bit. See 4 Ways To Tell If You’re Using 32-Bit Or 64-Bit Windows.


  1. You should find the “Microsoft.Teams.AddinLoader.dll” file in this folder. Copy the file path in the File Explorer’s address bar.
  2. Open the Start menu, type cmd in the search box, and select Run as administrator below the Command Prompt app.

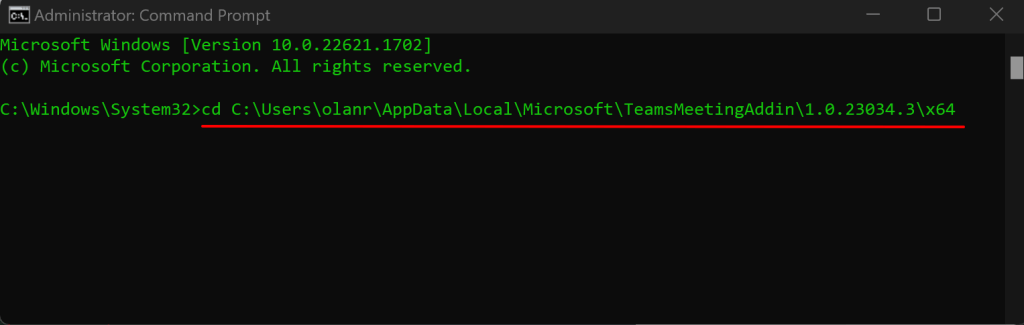
  3. Type cd, press the Spacebar, paste the Microsoft.Teams.AddinLoader.dll file path (see step #7) and press Enter. The command should look like the one below.cd C:\Users\username\AppData\Local\Microsoft\TeamsMeetingAddin\1.0.23034.3\x64
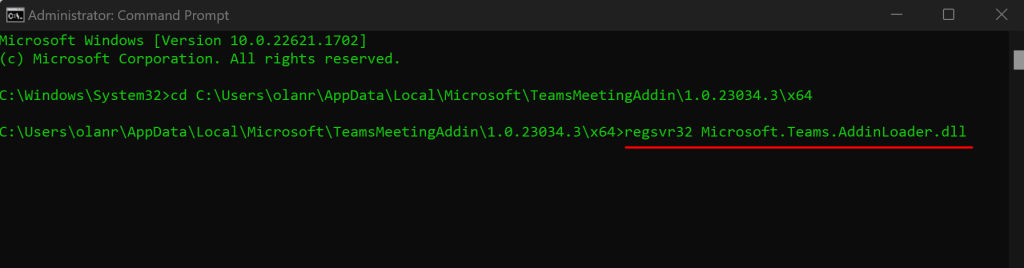
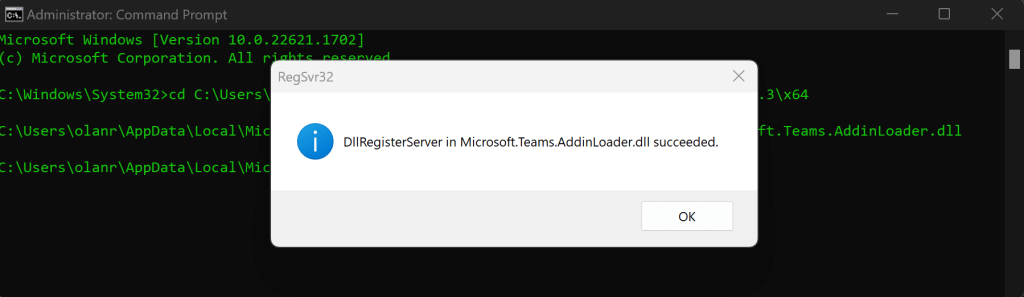
       7.    Next, paste regsvr32 Microsoft.Teams.AddinLoader.dll on the following line and press Enter.


7.       You should see a “DllRegisterServer in Microsoft.Teams.AddinLoader.dll succeeded.” message on your screen.

  1. Select OK, close the Command Prompt window, and check if the Teams Meeting option is now available in Outlook.

Method 3:

Update Registry Editor Keys


Another measure to help prevent the Teams Meeting add-in from being disabled by Outlook is to add this registry key:


  1. Open Registry Editor.
  2. Go to Registry Computer\HKEY_CURRENT_USER\Software\Microsoft\Office\16.0\Outlook\Resiliency\DoNotDisableAddinList
  3. Create a new DWORD (32-bit) value:
    1. Name: TeamsAddin.FastConnect
    2. Value: 1

Provide calendar access using powershell


Steps to provide calendar access


1.      Login to Exchange Online PowerShell


Run below command to grant calendar access as editor: -

Add-MailboxFolderPermission -Identity user1@xyz.com:\calendar -user user2@xyz.com -AccessRights Editor


Run below command to grant calendar access as editor with delegate flag: -

Set-Mailbox user1@xyz.com -GrantSendOnBehalfTo  user2@xyz.com


Add-MailboxFolderPermission user1@xyz.com:\calendar -User user2@xyz.com -AccessRights Editor -SharingPermissionFlags Delegate


Run below command to change existing calendar access: -

Set-MailboxFolderPermission -Identity user1@xyz.com:\calendar -user user2@xyz.com -AccessRights Editor

Display Organizer Name in Room Calendars

Display Organizer Name in Room Calendars

1.    Prerequisites:

·       You must be assigned the Exchange Online PowerShell role or have appropriate permissions in Exchange Management Shell.

·       Connect to Exchange Online PowerShell using:

Connect-ExchangeOnline -UserPrincipalName youradmin@domain.com


2.    Steps


1.     Connect Exchange online PowerShell

2.     Run the command below:


Set-CalendarProcessing -Identity conferenceroom@domain.com -DeleteComments $true -DeleteSubject $true -AddOrganizerToSubject $true -RemovePrivateProperty $true


Parameters:

  • -Identity conferenceroom@domain.com: Specifies the resource mailbox (conference room).
  • -DeleteComments $true: Removes any comments from meeting requests.
  • -DeleteSubject $true: Clears the subject line from the calendar entry.
  • -AddOrganizerToSubject $true: Adds the organizer’s name to the subject line.
  • -RemovePrivateProperty $true: Removes the “Private” flag from calendar items.


3.     Run this command to verify the changes:
Get-CalendarProcessing -Identity conferenceroom@domain.com | Format-List


The command does not delete information for the meeting organizer or attendees. Instead, it controls how the room mailbox displays meeting details to users who view the room's calendar (typically for availability purposes).


  • Meeting Organizer and Attendees:
    They still see the full meeting details (subject, comments, etc.) in their own calendars. Nothing is deleted from them.

  • Room Mailbox Calendar View (for others):
    These settings affect how the room's calendar appears to users who are not part of the meeting but are checking the room's availability.


Breakdown of Effects:

Setting

Impact

-DeleteComments $true

Comments in the meeting invite are removed from the room's calendar entry.

-DeleteSubject $true

Subject line is removed from the room's calendar entry.

-AddOrganizerToSubject $true

The organizer's name is added to the subject line (e.g., "Reserved by Rajat ").

-RemovePrivateProperty $true

Removes the "Private" flag so the meeting is not hidden from users with calendar access.


People who look at the room's calendar will not see the subject or comments, but will see who booked the room, which helps with transparency while maintaining privacy.


How to Cancel Future Meetings

 How to Cancel Future Meetings

Steps

The Remove-CalendarEvents cmdlet is used to cancel future meetings organized by a mailbox (typically when a user leaves the organization), without deleting their mailbox immediately.


1.     Connect to Exchange Online PowerShell

Connect-ExchangeOnline -UserPrincipalName youradmin@domain.com


2.     Preview Future Meetings (Optional but Recommended)


Remove-CalendarEvents -Identity user@xyz.com 

  -CancelOrganizedMeetings `

  -QueryWindowInDays 120 `

  -PreviewOnly


To preview which meetings will be canceled (without actually canceling them):

-Identity: The mailbox of the user.

-CancelOrganizedMeetings: Targets meetings organized by the user.

-QueryWindowInDays: Looks ahead 120 days from today.

-PreviewOnly: Shows what would be canceled without making changes.


3.     Cancel Future Meetings


Run the command without -PreviewOnly to cancel the meetings:


Remove-CalendarEvents -Identity user@xyz.com `

  -CancelOrganizedMeetings `

  -QueryWindowInDays 120


4.     Alternatively, you can also use a specific start date to preview and cancel meetings organized by a user.


Remove-CalendarEvents -Identity "user@xyz.com" -CancelOrganizedMeetings -QueryStartDate 01-01-2022 -QueryWindowInDays 900 -PreviewOnly


·       This cmdlet only affects meetings organized by the user, not meetings he was invited to.

·       Attendees will receive cancellation notices.

·       You must have the appropriate permissions (e.g., Organization Management role).

How to clean Teams application cache

How to clean Teams application cache


Steps 

Directory – 1


1. If Teams application is still running, right-click the Teams icon in the taskbar, and then select Quit.

2. Open the Run dialog box by pressing the Windows logo key + R.

3. In the Run dialog box, enter “%appdata%\Microsoft\Teams”, and then select OK.

4. Delete all files and folders in the “%appdata%\Microsoft\Teams” directory.


Directory - 2


1. Open the Run dialog box by pressing the Windows logo key + R.

2. In the Run dialog box, enter “C:\Users\%username%\AppData\Local\Packages\”, and then select OK.

3. Delete all files and folders in the C:\Users\%username%\AppData\Local\Packages\MSTeams_8wekyb3d8bbwe directory.


Final


1. Restart Teams.


Audit Teams chat

Auditing Private Chats in Teams - Microsoft Community


 Microsoft Teams > Find Chat Conversations Between Users

7/9/2021 · Applies to the Security and Compliance Center using eDiscovery to find conversations in Microsoft Teams

Image

Image

Image

Image

Image

Image

Image

Image

Image

Image

Image

Image

Image

Image

Image

Image

Image

Image

Image

Image

Image

Image

Image

Image

Image

Image

Image

Image

Image

Image